Pytest
官方文档:https://docs.pytest.org/en/stable/contents.html
API:https://docs.pytest.org/en/stable/reference/reference.html#
pip install -U pytest

pytest --version  # shows where pytest was imported from
pytest --help  # show help on command line and config file options
插件
插件列表:https://docs.pytest.org/en/stable/reference/plugin_list.html
- 内置插件:代码内部的
_pytest目录加载,包含内置 Fixture - 本地插件:
conftest.py在这里可添加钩子函数(Hooks)和自定义 Fixture,如果有多个 conftest 文件,就近原则,深度查找 - 外部插件:
pip install安装的插件,比如 Allure
基础使用
测试文件命名:test_xxx.py 或 xxx_test.py
import pytest


def setup_module():
    print("模块开始执行一次")

def teardown_module():
    print("模块结束执行一次")

def setup_function():
    print("每个函数前执行一次")

def teardown_function():
    print("每个函数后执行一次")

def test_func1():
    print("func1")
    assert a == b  # 断言

def test_func2():
    print("func2")

class TestDemo:
    # 不能写__init__方法

    def setup_class(self):
        self.k = "哈哈"  # 前置方法中的 self.xxx 属性可以被其他方法或用例引用
        print("类开始执行一次")

    def setup_method(self):
        print("每个方法前执行一次")

    # 等价于setup_method的简写
    def setup(self):
        print("每个方法前执行一次")

    # 等价于teardown_method的简写
    def teardown(self):
        print("每个方法后执行一次")

    def teardown_method(self):
        print("每个方法后执行一次")

    def teardown_class(self):
        print("类结束执行一次")

    # 注意:必须带self
    def test_method1(self):
        print(self.k)  # 调用前置方法中的属性
        print("method1")

    def test_method2(self):
        print("method2")
Fixture
可以实现与 setup 和 teardown 类似的效果,比如数据库连接、临时文件/目录创建、模拟对象、共享测试数据等
- 详解
@pytest.fixture(
    params=None,  # fixture 参数化
    ids=None,  # 给每组 case 起别名
    name=None  # fixture 的名称,默认就是函数名
    autouse=False,
        # False 默认,只会在传入函数名的 case 调用
        # True 无需传参,自动为 scope 范围内的所有 case 调用,但不能给 case 返回值
    scope=function,  # 作用范围
        # session 或 package 多个文件共调用一次,通常把 fixture 写在 conftest.py 文件中
        # module 模块级,类似于 setup/teardown_module,会在第一个调用它的函数前开始执行,在模块最后再执行,每个函数都调用其实是为了得到返回值
        # class 类级别,类似于 setup/teardown_function + setup/teardown_class
        # function 函数或者方法级(默认),类似于 setup/teardown_function + setup/teardown_method
)
- 示例
多个 Fixture 之间可以互相调用,Fixture 函数的参数只能是另一个 Fixture,比如 request
import pytest

@pytest.fixture(scope="function", autouse=False)
def login():  # 为区别于用例,函数命名不能以 test 开头
    print("登入")  # yield 前面的类似于 setup_xx
    yield xxx  # 在完成 yield 前面的操作后 return xxx
    print("登出")  # yield 后面的类似于 teardown_xx


# 函数前使用 fixture(可同时使用多个)
def test_01(login):  # 传入 fixture 函数名 login 作为参数
    print("case_01")  # 先登入,然后运行 case,最后登出


# 类前使用 fixture
"""
# 默认情况下,如果想让类中每一个方法都调用 fixture,挨个传入 fixture 名比较麻烦
# 此时则可以使用 usefixtures 装饰器让类中每个函数调用
# 不过这种方式与 autouse=Ture 一样无法给 case 返回值
"""
@pytest.mark.usefixtures("login")  # 注意:login 要写在引号内,可传入多个
class TestDemo:
    pass
内置 Fixture
# 查看所有可用的 fixture(包括内置的和自定义的)
pytest --fixtures
pytest --fixtures -v  # 更详细的信息
常见内置 Fixture
def test_multiple_fixtures(tmpdir, capsys, monkeypatch):
    # tmpdir: 临时目录
    test_file = tmpdir.join("test.txt")
    test_file.write("test")

    # capsys: 捕获输出
    print("Captured output")
    captured = capsys.readouterr()

    # monkeypatch: 临时修改环境
    monkeypatch.setenv("TEST_VAR", "test_value")

    assert "TEST_VAR" in os.environ
自定义 Fixture
定义在 conftest 文件中的 Fixture,可以被同级目录多个包共享
# 动态生成日志文件名,即每执行一次就生成一个单独的日志文件
@pytest.fixture(scope="session", autouse=True)
def manage_logs(request):
    # 时间作为文件名就没必要加 - 或 : 等符号了
    now = time.strftime("%Y%m%d_%H%M%S")
    # 当前目录为 pytest.ini 文件所在的位置
    log_name = f'data/logs/{now}.log'
    request.config.pluginmanager.get_plugin("logging-plugin").set_log_path(log_name)


# 解决收集 Case 中文乱码问题
def pytest_collection_modifyitems(items):
    for item in items:
        item.name = item.name.encode("utf-8").decode("unicode_escape")
        item._nodeid = item.nodeid.encode("utf-8").decode("unicode_escape")
Hooks
Pytest 提供了很多内置钩子函数(Hooks),用于扩展 Pytest 本身的行为,在特定事件时自动被调用
查看内置钩子:python -m pytest --trace-config
https://docs.pytest.org/en/stable/how-to/writing_hook_functions.html
可以通过这些内置钩子来修改收集的测试项、添加自定义命令行选项、改变测试报告生成方式、在测试生命周期特定点执行代码等
# conftest.py
# 按调用顺序如下

import pytest

def pytest_configure(config):
    print("1. pytest_configure - 配置初始化")

def pytest_sessionstart(session):
    print("2. pytest_sessionstart - 会话开始")

def pytest_collection(session):
    print("3. pytest_collection - 开始收集测试")

def pytest_collection_modifyitems(session, config, items):
    print(f"4. pytest_collection_modifyitems - 修改测试项,处理 {len(items)} 个测试")

def pytest_collection_finish(session):
    print("5. pytest_collection_finish - 收集完成")


def pytest_runtest_protocol(item, nextitem):
    print(f"6. pytest_runtest_protocol - 测试协议开始: {item.name}")

def pytest_runtest_setup(item):
    print(f"7. pytest_runtest_setup - 设置阶段: {item.name}")

def pytest_runtest_call(item):
    print(f"8. pytest_runtest_call - 执行测试: {item.name}")

@pytest.hookimpl(hookwrapper=True)
def pytest_runtest_makereport(item, call):
    outcome = yield
    report = outcome.get_result()
    print(f"9. pytest_runtest_makereport - 生成报告: {report.outcome}")

def pytest_runtest_logreport(report):
    print(f"10. pytest_runtest_logreport - 记录报告: {report.when} {report.outcome}")

def pytest_runtest_teardown(item, nextitem):
    print(f"11. pytest_runtest_teardown - 清理阶段: {item.name}")


def pytest_sessionfinish(session, exitstatus):
    print(f"12. pytest_sessionfinish - 会话结束: {exitstatus}")

def pytest_unconfigure(config):
    print("13. pytest_unconfigure - 配置清理")
参数化
https://docs.pytest.org/en/stable/how-to/parametrize.html
用例参数化 @pytest.mark.parametrize
前置方法不能使用装饰器参数化,需要借助 fixture 实现
import pytest

# 数据驱动:把Case存入YAML、EXCEL等文件中读取
_list = yaml.safe_load(open(yaml_file))  # [[1,1], [1, 2], [1,3], [2,1], [2,2], [2,3]]

"""
@pytest.mark.parametrize(
    argnames,  被参数化的变量,字符串中逗号分隔变量,也可以是列表或元组的形式
    argvalues,  与变量一一对应的一组值:[(1,2), (1,3), (1,4)],这里最好用列表,而不要用元组,元组只有一个元素时如果忘记加逗号很容出错
    ids=None,  给每组Case起别名
    indirect= bool | Sequence[str]  间接使用同名 Fixture
)
"""
@pytest.mark.parametrize("a,b", _list)
def test_demo(a, b):
    print(a+b)


# 笛卡尔积形式,会产生 2x3=6 条 Case,与上面等价
@pytest.mark.parametrize("a", [1, 2])
@pytest.mark.parametrize("b", [1, 2, 3])
def test_demo(a, b):
    print(a+b)
Fixture 参数化
import pytest

@pytest.fixture(params=[(1,2,3), (11,22,33)])
def login(request):  # request 其实是一个内置 Fixture
  return request.param  # 固定用法,通过request.param拿到每一组数据,

def test_01(login):
  print(login[0] + login[1] + login[2])
Parametrize 结合 Fixture 使用
indirect=True所有参数都使用同名 Fixture 来处理indirect=["fixture1"]指定参数使用同名 Fixture 来处理
此列表中 argname 对应的 argvalue 将作为 request.param 传递到其各自的 argname 同名的 Fixture 函数,如果为 True,则包含所有 argname。
def connect_to_database(config):
    # 模拟连接数据库
    if config == "sqlite":
        return "Connected to SQLite"
    elif config == "mysql":
        return "Connected to MySQL"
    else:
        raise ValueError("Unsupported database")


import pytest

# Fixture 1
@pytest.fixture
def db_config(request):
    config = request.param
    return connect_to_database(config)

# Fixture 2
@pytest.fixture
def timeout(request):
    return request.param


# 使用 Fixture 1
@pytest.mark.parametrize("db_config", ["sqlite", "mysql"], indirect=True)
def test_database_connection(db_config):
    assert "Connected" in db_config

# 使用 Fixture 1 和 2
@pytest.mark.parametrize("db_config,timeout", [("sqlite", 10), ("mysql", 20)], indirect=True)
def test_database_connection(db_config):
    assert "Connected" in db_config

# 使用 Fixture 1 和 2,也可以写成
@pytest.mark.parametrize("db_config,timeout", [("sqlite", 10), ("mysql", 20)], indirect=["db_config", "timeout"])


# 使用 Fixture1 和 普通参数
"""
这里的 timeout 只是普通的参数,不会被传递给 Fixture 2
"""
@pytest.mark.parametrize("db_config,timeout", [("sqlite", 10), ("mysql", 20)], indirect=["db_config"])
def test_partial_indirect(db_config, timeout):
    assert "Initialized" in db_config
    assert isinstance(timeout, int)
    assert timeout in [10, 20]
断言
assert 语句
assert xx  # 判断xx为真
assert not xx  # 判断xx不为真
assert a in b  # 判断b包含a
assert a == b  # 判断a等于b
assert a != b  # 判断a不等于b
pytest.raise() 上下文管理器
预期异常的断言
def test_zero_division():
    with pytest.raises(ZeroDivisionError):
        1 / 0
正则匹配异常信息
def myfunc():
    raise ValueError("Exception 123 raised")

def test_match():
    with pytest.raises(ValueError, match=r".* 123 .*"):
        myfunc()
多重断言插件
pip install pytest-assume
def test_01(self):
    pytest.assume(1 == 2)  # 第一个断言失败不影响后面的断言
    pytest.assume(1 == 1)
调用
https://docs.pytest.org/en/stable/how-to/usage.html
- 代码中调用
正常运行 .py 文件即可触发
if __name__ == '__main__':
    # pytest.main()
    pytest.main(["test_demo.py::类/函数", "-参数"])
- 命令行中调用
pytest  # 测试所有路径所有文件中符合编写规范的用例
pytest test_suite/  # 测试指定路径下的所有文件
pytest test_mod.py  # 测试指定文件
pytest test_mod.py::TestClass  # 测试指定类
pytest test_mod.py::test_func  # 测试指定方法
pytest test_mod.py::TestClass::test_func  # 测试指定类下的指定方法
pytest tests/test_mod.py::test_func[x1,y2]  # 测试指定参数化
测试指定关键字 -k
模糊匹配,且不区分大小写
# 匹配所有带关键字的文件
pytest -k "a or b"  # Windows环境表达式必须用双引号
# 表达式形式
"""
a  匹配 test_axx.py test_xAx.py 等
not a
a or b  匹配 test_axx.py 和 bxx.py
a and b  匹配 test_axb.py,即文件名即包含a还得包含b
a and not b  文件名包含a但不包含b
"""
测试指定标记 -m
# 测试所有带 @pytest.mark.P1 装饰器的用例
# 也可以像 -k 一样使用表达式
pytest -m P1
- 自定义标记
# 一条用例可加多个标记
@pytest.mark.xxx
@pytest.mark.yyy
def test_demo2(self):
    pass
自定义标记通常要在配置文件中注册
否则会显示警告 PytestUnknownMarkWarning,不过不影响运行
[pytest]
markers =
  default
  P1
  xxx
测试指定规则文件 @file.txt
可以把上面所有要测试的范围写到 .txt 文件中,然后用 @ 从文件中读取
pytest @tests_to_run.txt

# tests_to_run.txt 每行一条
'
tests/test_file.py
tests/test_mod.py::TestClass
tests/test_mod.py::test_func
-m P1
'
管理用例执行顺序
pytest --collect-only 收集所有测试用例(但不执行),查看执行顺序
Pytest 收集测试用例时,不同模块之间会按文件系统顺序(通常是字母顺序),深度优先,而同一模块中,会按类和函数的定义顺序
- 使用钩子自定义排序
# conftest.py
def pytest_collection_modifyitems(items):
    # 自定义排序逻辑
    items.sort(key=lambda x: x.name)  # 按名称字母排序
- 指定顺序执行
pip install pytest-ordering

"""
@pytest.mark.run(order=n)  # n: 0、1、2、3、-3、-2、-1
未指定的用例将在这些指定了顺序的用例后按默认顺序执行
"""
- 随机执行
pip install pytest-random-order
- 并发执行(多进程)
pip install pytest-xdist

pytest -n auto  # 自动分配,检测系统空闲CPU数量并发执行
pytest -n 4  # 限制最多4个CPU并发执行
管理用例间依赖关系
pip install pytest-dependency
如果被依赖的用例 SKIPPED 或者 FAIL,则本条用例会自动 SKIPPED
如果执行用例时,被依赖用例还未被执行,则会先执行被依赖用例
import pytest

# 标记被依赖用例,并起个名字,scope 可以指定范围,默认 module
@pytest.mark.dependency(name="user_registration", scope="class")
def test_user_registration():
    pass

# name 可以省略,会自动以函数名命名
@pytest.mark.dependency()
def test_user_login():
    pass

# 使用依赖,可以依赖多个用例,被依赖用例全部通过才会执行此用例
@pytest.mark.dependency(depends=["user_registration", "test_user_login"])
def test_user_profile_update():
    pass
缓存机制
https://docs.pytest.org/en/stable/how-to/cache.html#usage
pytestconfig 是 Pytest 的一个内置 Fixture,它提供了对 Pytest 配置对象、命令行参数、插件等的访问
cache = pytestconfig.cache
cache.set(key, value)  # 写入缓存
cache.get(key, default)  # 读取缓存
缓存的数据会被写入项目根目录下的 .pytest_cache 文件中,只能缓存可被 JSON 序列化的数据,不能缓存数据库连接、文件对象等非序列化对象
pytest --cache-show  # 查看缓存内容
pytest --cache-clear  # 清除缓存内容
def test_expensive_computation(pytestconfig):
    # 1. 尝试从缓存中读取
    cache = pytestconfig.cache
    cached_result = cache.get("my_expensive_value", None)

    # 2. 如果缓存中没有,则进行计算并缓存
    if cached_result is None:
        print("计算中...(这只会发生一次)")
        cached_result = 42 * 2  # 模拟昂贵计算
        cache.set("my_expensive_value", cached_result)
    else:
        print("从缓存中读取!")

    # 3. 使用计算结果进行断言
    assert cached_result == 84

def test_another_test_that_needs_the_value(pytestconfig):
    # 这个测试也可以访问同一个缓存值
    cache = pytestconfig.cache
    value = cache.get("my_expensive_value")
    # 因为上一个测试已经设置过缓存,这里可以直接使用
    assert value is not None
    print(f"在另一个测试中获取到值: {value}")
用例执行失败处理
跳过
https://docs.pytest.org/en/stable/how-to/skipping.html
# 直接跳过
@pytest.mark.skip("xx原因,可省略")

# 满足条件,则跳过
@pytest.mark.skipif(a==1, reaseon="xx")

# 满足条件,引发预期失败(XFAIL)或意外通过(XPASS)
@pytest.mark.xfail(a==1, reaseon="已知问题,待修复")
def test_demo(self):
    pass
退出
pytest -x  # 遇到失败,立即退出,常用于冒烟测试
pytest --maxfail=n  # 遇到 n 条失败后退出
重跑
重跑底层依赖了 Pytest 内置的缓存机制,失败记录在 .pytest_cache/v/cache/lastfailed 文件中
{
  "test_file.py::test_function1": true,
  "test_file.py::TestClass::test_method2": false
}
- 内置方法
# only re-run the failures
pytest --lf  # 等价于 --last-failed

# 先运行失败的测试,然后再运行其他的
pytest --ff  # 等价于 --failed-first

# 先运行新添加的或修改的测试(基于 git)
pytest --nf
- 插件:
pip install pytest-rerunfailures
运行时指定
pytest --reruns 3  # 失败时重跑5次
pytest --reruns 3 --maxfail=5  # 如果初次加重跑时,累计失败用例达到5条,则停止测试
或者标记中指定
import pytest

# 如果失败,自动重跑用例 3 次,每次重试之间延迟 2 秒
@pytest.mark.flaky(reruns=3, reruns_delay=2)
@pytest.mark.parametrize("number", [1, 2, 3, 4, 5])
def test_even(number):
    assert number % 2 == 0  # 这将导致奇数测试失败
测试结果
命令行打印
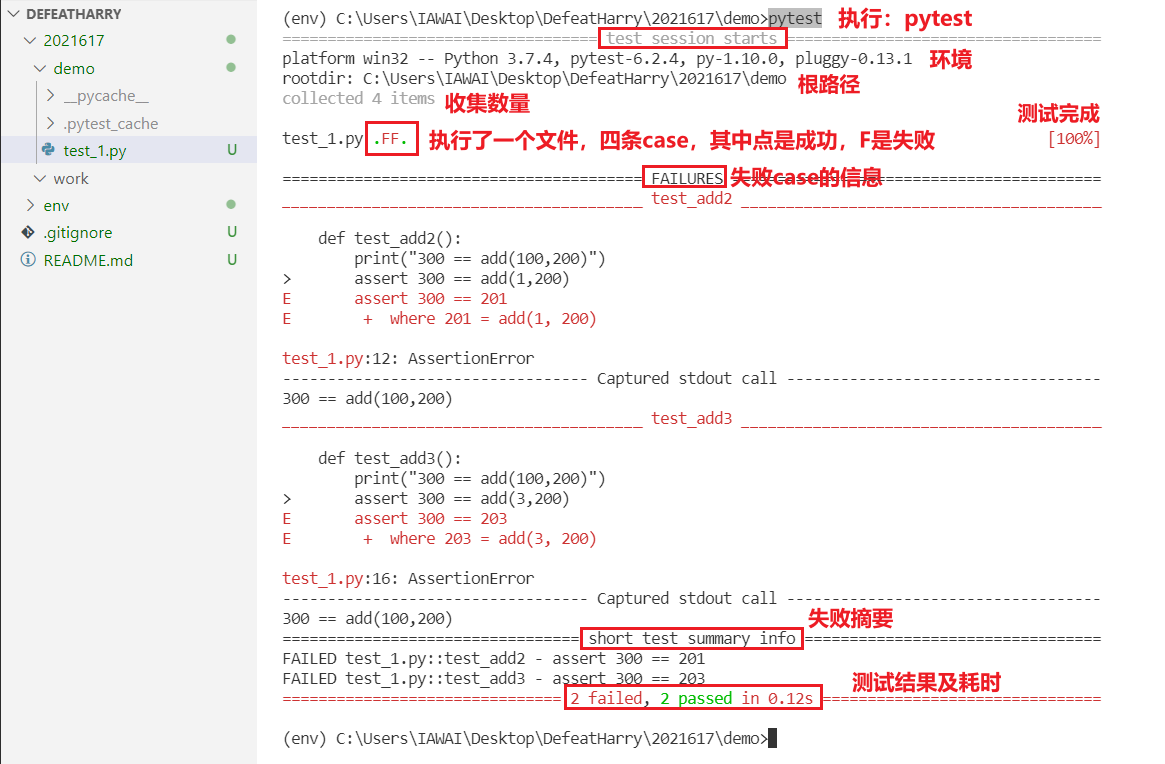
.F.F.. 中的 . 代表测试通过,F 代表测试失败(Fail)
Case 中的断言如果失败,结果会显示 failed
Fixture 中的断言如果失败,结果会显示 error
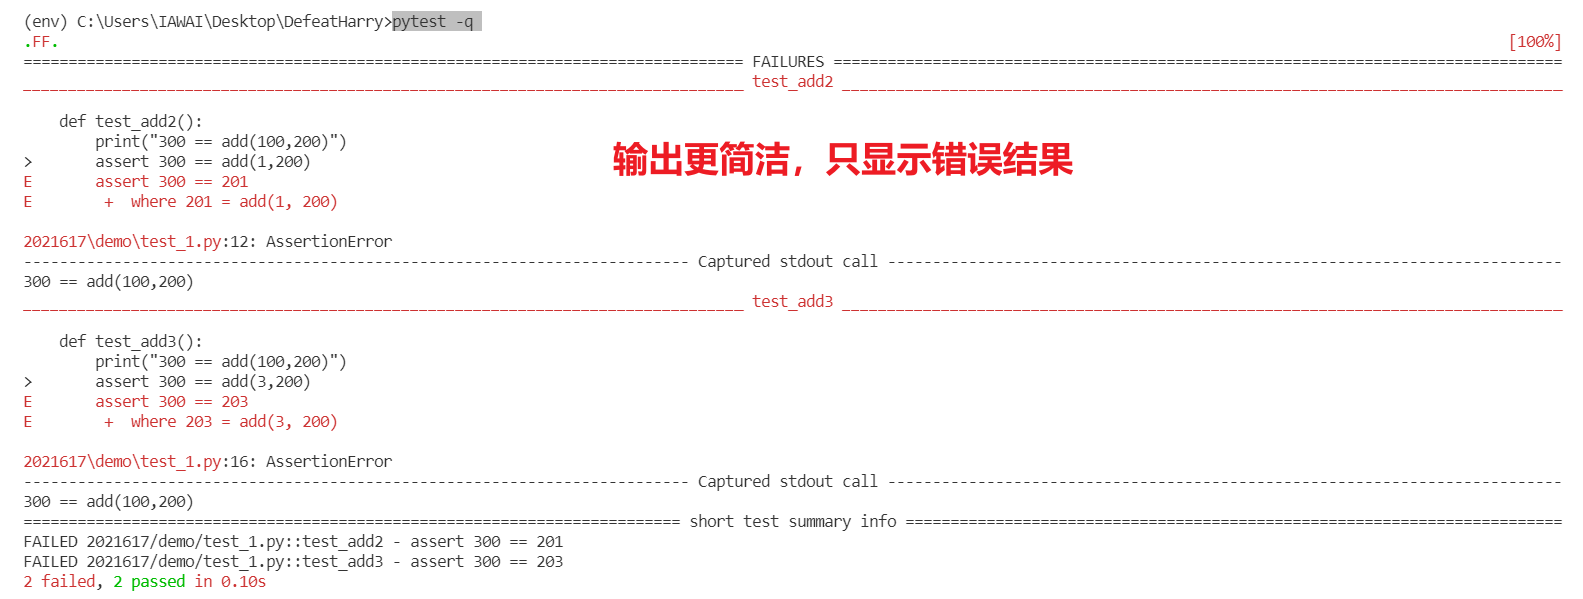
-q或--quiet精简信息
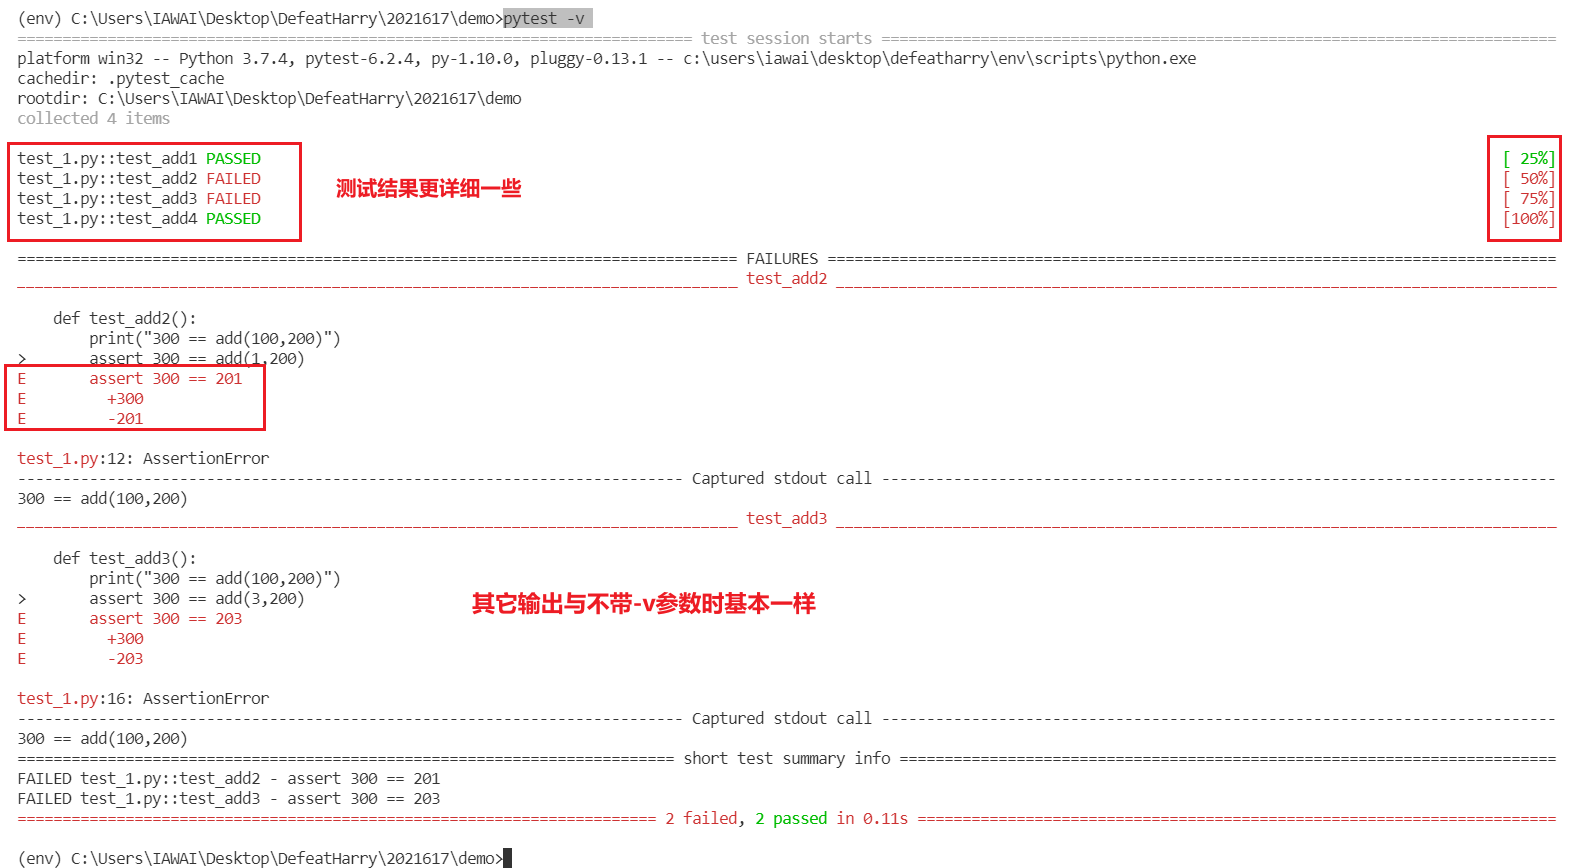
-v
--verbose 增加详细程度
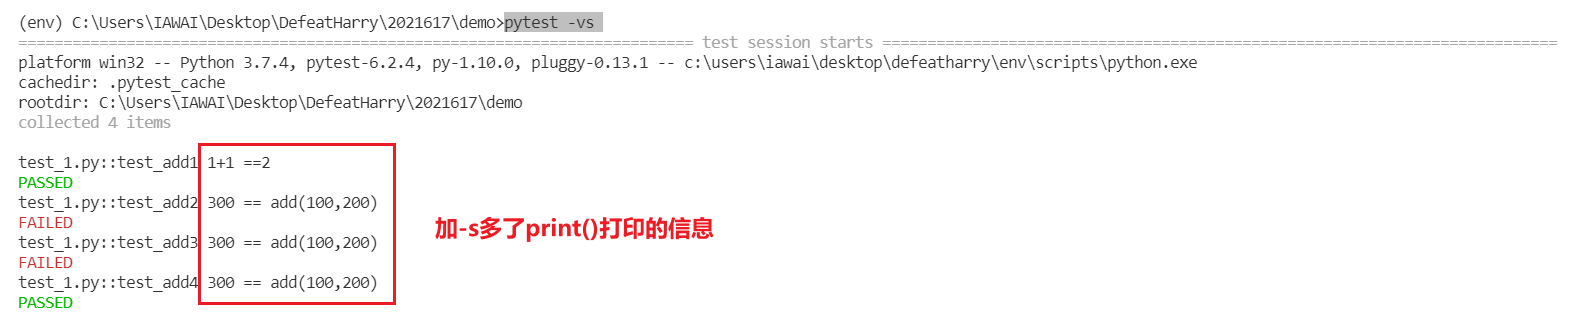
-s
--capture=no 捕获 print() 信息
输出到测试报告时,-s 参数就会失效
--setup-show
查看执行逻辑,显示 setup 和 teardown,以及 Fixture 调用关系
生成 XML 报告
pytest junitxml=./result.xml
生成 HTML 报告
pip install pytest-html

# --self-contained-html css样式混在html中,不加则独立
pytest --html=report.html --self-contained-html
- 修改 HTML 报告
修改与汉化:https://www.cnblogs.com/linuxchao/p/linuxchao-pytest-html.html
import pytest
from py._xmlgen import html


# 测试报告标题
def pytest_html_report_title(report):
    report.title = "接口自动化测试报告"

# 修改Environment
def pytest_configure(config):
    config._metadata.pop("Plugins")  # 删除
    config._metadata["Data Path"] = "data/"  # 添加

# 修改Summary
@pytest.mark.optionalhook
def pytest_html_results_summary(prefix):
    prefix.extend([html.p("测试项目: EE")])

# 删除header
@pytest.mark.optionalhook
def pytest_html_results_table_header(cells):
    cells.pop(-1)  # link列

# 删除row
@pytest.mark.optionalhook
def pytest_html_results_table_row(report, cells):
    cells.pop(-1)  # link row

# 解决中文乱码
# @pytest.mark.hookwrapper
# def pytest_runtest_makereport(item):
#     outcome = yield
#     report = outcome.get_result()
#     getattr(report, 'extra', [])
#     report.nodeid = report.nodeid.encode("utf-8").decode("unicode_escape")
配置文件
pytest.ini可以改变 Pytest 的默认行为,Windows 下不能使用中文tox.ini与pytest.ini类似,用 tox 工具时候才有用setup.cfg影响setup.py的行为
比如 pytest.ini
[pytest]
; 参数化中的非 Unicode 字符串默认会进行转义,设置这个让它不转义
; 但这个方法可能会有问题,建议使用 conftest.py
disable_test_id_escaping_and_forfeit_all_rights_to_community_support = True

; 限定Case路径,指定后就无法再指定具体文件具体方法等
testpaths = test_case

; 自定义标签,加到配置避免标签unknown警告
markers =
  mark1
  mark2: 可以加一些说明

; 设置运行时参数
addopts =
  -vs  ; 详细信息,打印print
  --setup-show  ; 显示setup和teardown
;   --collect-only  ; 执行预览,并不真的运行
Pytest 对 logging 模块做了改写,需要在 pytest.ini 中做一些配置
[pytest]

;控制台日志开关 true false
log_cli = true
;日志级别
log_cli_level = info
;日志格式: 时间 级别 信息 文件名及行号
log_cli_format = %(asctime)s [%(levelname)s] %(message)s (%(filename)s:%(lineno)s)
;日志日期格式
log_cli_date_format = %Y-%m-%d_%H:%M:%S

;日志保存到文件的位置,当前目录为调用pytest.ini的文件所在的位置
log_file = ./data/logs/test.log
;日志级别
log_file_level = info
;日志格式: 时间 级别 信息 文件名及行号
log_file_format = %(asctime)s [%(levelname)s] %(message)s (%(filename)s:%(lineno)s)
;日志日期格式
log_file_date_format = %Y-%m-%d_%H:%M:%S