Selenium
pip install selenium
- PyPI
- 官方文档
- API文档
- 从Selenium3升级到4
- 用于测试的demo网站:https://sahitest.com/demo/
核心组成及原理
- Selenium IDE 浏览器插件,用于录制简单的脚本
- Selenium Webdriver 底层依赖
- Selenium Grid 支持远程和分布式运行测试用例
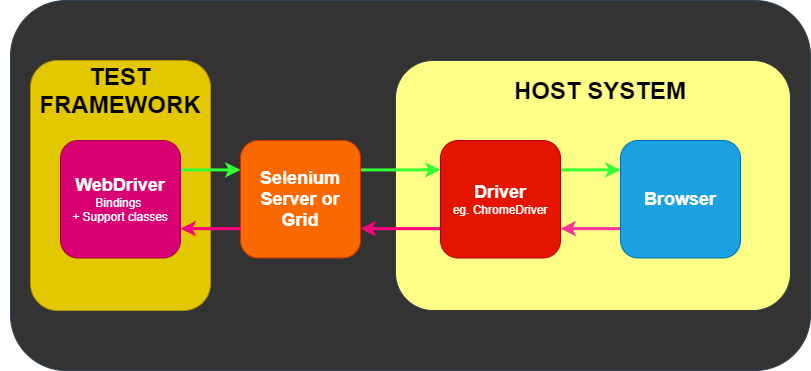
- client:执行代码的计算机
- remote(end-node):带有浏览器和驱动程序的计算机
浏览器驱动
- chromedriver
- geckodriver
- safaridriver 无需下载,已内置在
usr/bin/中,But You must enable the 'Allow Remote Automation' option in Safari's Develop menu to control Safari via WebDriver.
将驱动放入PATH环境变量
Mac
mv chromedriver /usr/local/bin,或者打开 Finder,使用快捷键Command+Shift+G,前往文件夹/usr/local/bin,将下载的驱动文件拖入。- 打开终端,执行
vim ~/.bash_profile,添加环境变量export PATH=$PATH:/usr/local/bin/chromedriver,保存后执行source ~/.bash_profile生效。(如果不是自定义路径,这步可省略) - 执行
chromedriver --version,如果返回版本号则说明配置正确,如果提示无法验证开发者,需要到系统设置 隐私与安全性界面准许权限。
Windows
- 下载的驱动文件可以集中放在一个文件夹内,比如
selenium-driver - 然后将该文件路径添加到
环境变量\系统变量\Path中 - 打开终端,执行
chromedriver --version,如果返回版本号则说明配置正确
启动
Chrome
from selenium import webdriver

driver = webdriver.Chrome()
# 如果没有配置环境变量,需要指定路径
# driver = webdriver.Chrome(executable_path='Xxx/chromedriver')

# url必须带 scheme://
driver.get("http://selenium.dev")
driver.quit()
debug 模式启动 Chrome
通过 debug 模式可以让 Selenium 连接到手动打开的浏览器窗口,而不是每次启动一个新的的窗口,通常用于调试定位,而不需要依赖其它页面的操作
首先需要关闭所有Chrome浏览器窗口,并保证进程已退出,命令行以调试模式启动 Chrome
- Mac:
/Applications/Google\ Chrome.app/Contents/MacOS/Google\ Chrome --remote-debugging-port=9222(空格需要用\转义) - Windows:
.\chrome --remote-debugging-port=9222(先切换到chrome.exe所在目录)
访问 http://127.0.0.1:9222,如果不报错,而是空白页面,这说明调试模式启动成功
手动打开想要调试的页面
然后脚本中即可使用 debug 模式启动,便可连接到已经打开的页面,进行调试
chrome_options = webdriver.ChromeOptions()
chrome_options.debugger_address = "localhost:9222"
# 或者
from selenium.webdriver.chrome.options import Options
chrome_options = Options()
chrome_options.add_experimental_option("debuggerAddress", "localhost:9222")  # add_experimental_option 方法用于添加一些不是常规Chrome选项的实验性或非标准选项

# 设置参数
driver = webdriver.Chrome(options=chrome_options)
其它浏览器
- Safari
需要先在 Safari浏览器-偏好设置-高级,勾选 在菜单中显示开发,然后在 开发者设置 中,勾选 允许远程自动化
driver = webdriver.Safari()
- FireFox
driver = webdriver.Firefox()
- PhantomJS
driver = webdriver.PhantomJS()
Browser Options
通用选项
- 页面加载策略
from selenium import webdriver
options = webdriver.ChromeOptions()
# 或
from selenium.webdriver.chrome.options import Options
options = Options()

options.page_load_strategy = 'eager'
driver = webdriver.Chrome(options=options)
"""
normal 默认值,等待所有资源下载后才开始执行自动化操作
eager DOM加载完即开始,不等待图像、css、js等资源加载完成,通常这些需要较长时间,但对自动化并不是很重要
none 仅等待初始页面加载,不会阻塞 WebDriver
"""
ChromeOptions
- https://www.selenium.dev/documentation/webdriver/browsers/chrome/
- https://chromedriver.chromium.org/capabilities
- https://zhuanlan.zhihu.com/p/60852696
options = webdriver.ChromeOptions()

options.xxx

driver = webdriver.Chrome(options=options)
options.add_argument
https://www.selenium.dev/documentation/webdriver/browsers/chrome/#arguments
# 以最大化方式启动浏览器
options.add_argument("--start-maximized")
# 指定浏览器存储用户配置文件的目录,会话将不再是隐身模式
options.add_argument("--user-data-dir=...")
# 以无头模式运行
options.add_argument("--headless=new")
options.add_experimental_option
# 只要不发送退出命令,进程结束后保持打开状态,即不自动关闭窗口
options.add_experimental_option("detach", True)

# 去除提示:Chrome正在受到自动软件的控制
options.add_experimental_option('useAutomationExtension', False)
options.add_experimental_option('excludeSwitches', ['enable-automation'])

# 关闭:是否保存密码弹框
prefs = {
    "credentials_enable_service": False,
    "profile.password_manager_enabled": False
}
options.add_experimental_option("prefs", prefs)
Driver Service Class
https://www.selenium.dev/documentation/webdriver/drivers/service/
# 日志输出到文件
service = webdriver.ChromeService(log_output=log_path)
driver = webdriver.Chrome(service=service)
操控浏览器
- 属性
print(driver.name)  #浏览器名称
print(driver.curent_url)  # 当前url
print(driver.title)  # 当前页面标题
print(driver.page_source)  # 当前页面源码
print(driver.window_handles)  # 当前窗口所有句柄
print(driver.current_window_handle)  # 当前窗口句柄
- 方法
driver.maximize_window()  # 窗口最大化

driver.get_cookies()  # 获取cookies

driver.forward()  # 前进
driver.back()  # 后退

driver.refresh()  # 刷新页面

driver.close()  # 关闭页面
driver.quit()  # 退出浏览器
driver.switch_to.frame(element)  # 切换到frame
driver.switch_to.default_content()  # 返回主frame
driver.switch_to.parent_frame()  # 返回父frame

driver.switch_to.window(driver.window_handles[1])  # 切换标签页

driver.switch_to.active_element  # 切换到活动元素
- 执行js
# 执行js脚本
driver.execute_script("js_cmd")  # 同步
driver.execute_async_script("js_cmd")  # 异步
# 命令中使用return才能得到返回值
js_cmd = "return JSON.stringify(performance.timing)"
loc = driver.execute_script(js_cmd)
# 执行多条命令
loc = driver.execute_script("return js_code1; js_code2")
# 或者
for code in ["return js_code1", "return js_code2"]:
    print(driver.execute_script(code))
# 通常想要控制的元素带有readonly属性,可以用js移除readonly属性
code = 'a = document.getElementById("train_date"); a.removeAttribute("readonly"); a.value="2021-06-29"'
driver.execute_script(code)
Locators
Selenium v4.x 移除了
driver.find_element_by_xxx这种写法
Traditional Locators
建议优先选择顺序:ID > CSS Selector > Xpath
from selenium import webdriver
from selenium.webdriver.common.by import By

"""
<label for="fname"> First name </label>
<input class="testclass" type="text" id="testid" name="testname" value="testvalue">
<a href ="www.selenium.dev">Selenium Official Page</a>
"""

# ID
driver.find_element(By.ID, "testid")

# Name
driver.find_element(By.NAME, "testname")

# Class
driver.find_element(By.CLASS_NAME, "testclass")  # 不支持复合类

# Tag
driver.find_element(By.TAG_NAME, "input")

# 超链接文本
driver.find_element(By.LINK_TEXT, "Selenium Official Page")  # 精准匹配
driver.find_element(By.PARTIAL_LINK_TEXT, "Selenium")  # 模糊匹配

# CSS Selector
driver.find_element(By.CSS_SELECTOR, "#testid")

# XPath
driver.find_element(By.XPATH, "//input[@value='testvalue']")
Relative Locators
Selenium 4 引入了 RelativeLocator,可连用
above:定位某个元素上方的元素below:定位某个元素下方的元素to_left_of:定位某个元素左侧的元素to_right_of:定位某个元素右侧的元素near:定位某个元素附近的元素(默认为50像素内)
from selenium import webdriver
from selenium.webdriver.common.by import By
from selenium.webdriver.support.relative_locator import locate_with

driver = webdriver.Chrome()
driver.get('您的网页URL')

# 假设我们可以直接定位到一个元素
known_element = driver.find_element(By.ID, 'knownElementId')
# 定位到已知元素下方tag_name是input的元素
locator = locate_with(By.TAG_NAME, 'input').below(known_element)
element_below = driver.find_element(locator)

# 对找到的元素进行操作,例如点击
element_below.click()

# ... 进行你的其他操作 ...

# 最后,关闭浏览器
driver.quit()
Script Locators
- DOM
dom = 'document.'
driver.execute_script(js)
- JQuery
jq_css = '$("#id")'
jq_xpath = '$x("#id")'
driver.execute_script(jquery)
定位技巧
如果有多个相同的元素,使用 find_element 查找时只会返回第一个,使用 find_elements 会以列表的形式全部返回,如果没有匹配项,则返回空列表。
-
尽量使用 CSS 或 XPATH 选择器替代嵌套查找
-
查找子元素
先定位到父元素,基于父元素定位其子元素
# 示例1
fruits = driver.find_element(By.ID, "fruits")
fruit = fruits.find_element(By.CLASS_NAME,"tomatoes")

# 示例2
element = driver.find_element(By.TAG_NAME, 'div')
elements = element.find_elements(By.TAG_NAME, 'p')
- 可以直接移动到活动的元素 active_element
driver.find_element(By.CSS_SELECTOR, '[name="q"]').send_keys("webElement")
attr = driver.switch_to.active_element.get_attribute("title")
与元素交互
https://www.selenium.dev/documentation/webdriver/elements/interactions
send_keys
- 输入文本内容
需要是 text 类型并具有 content-editable 属性
element.send_keys("xxx")
- 输入快捷键
element.send_keys(Keys.CONTROL, "v")
- 上传文件
如果一个 input 元素是 type 类型,可以使用 send_keys 方法上传文件(需要使用完整路径)
import os
current_dir = os.path.dirname(__file__)
file_path = os.path.join(current_dir, 'images', 'demo.png')

file_input = driver.find_element(By.CSS_SELECTOR, "input[type='file']")
file_input.send_keys(file_path)
clear
清空输入内容
需要是 text 类型并具有 content-editable 属性
element.clear()
clear
单击,适用于任何元素
element.click()
获取元素信息
e.id  # 标示
e.size  # 宽高
e.rect  # 宽高和坐标
e.text  # 文本内容
e.tag_name  # 标签名

e.is_selected  # 是否被选中
e.is_enabled  # 是否可用
e.is_displayed  # 是否显示
e.value_of_css_property  # css属性值

e.get_attribute("属性") # 获取属性值
e.get_attribute("class")  # 获取类
e.get_attribute("value")  # 获取输入值
弹框的处理
弹框主要有三种,处理方式基本一致
- alert
- confirm
- prompt
# 先定位到弹框
# 然后切换到alert
a = driver.switch_to.alert

a.accept()  # 确认
a.dismiss()  # 取消
a.send_keys("xxx")  # 输入内容
a.text  # 显示弹框的文本
下拉框的处理
from selenium import webdriver
# 需要引入Select类
from selenium.webdriver.support.select import Select

se = self.driver.find_element_by_id('s4Id')
select = Select(se)
# 通过索引勾选
select.select_by_index(3)

for i in range(7):
    select.select_by_index(i)

# 通过选项value值勾选
select.select_by_value('o4val')
# 通过选项文本勾选
select.select_by_visible_text('o1')

# 取消勾选
select.deselect_by_index(3)
select.deselect_by_value('o4val')
select.deselect_by_visible_text('o1')
# 取消所有已选选项
select.deselect_all()

# 返回所有选项
for option in select.options:
    print(option.text)

# 返回所有被选中的选项
for option in select.all_selected_options:
    print(option.text)

# 返回被选中的第一个选项
print(select.first_selected_option.text)
等待的处理
隐性等待和显性等待同时存在时,取两者中最长的等待时间为有效等待时间。
强制等待
强制线程休眠一定时间,一般只在调试过程中使用
import time

time.sleep(5)
隐性等待
在指定时间内,自动每隔0.5s查找一次元素,找到则退出循环,没找到则继续,超过指定的时常则抛出异常。
需要注意的是,当定位到元素后与 .click() 连用时,隐性等待会失效
driver.implicitly_wait(5)
显性等待
from selenium.webdriver.support.ui import WebDriverWait

# driver
# timeout 超时时间
# poll_frequency 检测频率,默认为0.5s
# ignored_exceptions 超时后抛出异常,默认为NoSuchElementException
wait = WebDriverWait(self.driver, timeout, poll_frequency=0.5, ignored_exceptions=None)

# 满足预期条件时跳出等待向下执行,超时则抛出TimeoutException`、异常
wait.until(method, message='')
wait.until_not(method, message='')
其中的method可以自定义也可以使用EC模块提供的函数
预期条件·EC
貌似必须得配合显性等待使用
from selenium.webdriver.support import expected_conditions as EC
最常用的三个
# 判断某个元素是否被加到了dom里,但不一定可见
EC.presence_of_element_located(locator)

# 判断某个元素是否可见,宽和高等大于0
EC.visibility_of_element_located(locator)

# 判断某个元素中是否可点击
EC.element_to_be_clickable(locator)
其它
# 判断页面上是否存在弹框
EC.alert_is_present()

# 判断该frame是否可以switch进去,如果可以的话,返回true并且switch进去,否则返回false
EC.frame_to_be_available_and_switch_to_it()
# 判断title是否为xxx
EC.title_is("xxx")
# 判断title是否包含xxx
EC.title_contains("xxx")

# 判断某元素的文本是否包含xxx
EC.text_to_be_present_in_element(locator, xxx)
# 判断某元素的属性值是否包含xxx
EC.text_to_be_present_in_element_value(locator, xxx)
# 判断某个元素中是否存在于dom或不可见
EC.invisibility_of_element_located(locator)
# 判断等待某个元素从dom树中是否移除
EC.staleness_of()

# 判断是否至少有1个元素存在于dom中
EC.presence_of_all_elements_located(locator)
# 判断是否至少有一个元素可见
EC.visibility_of_any_elements_located(locator)
# 判断某个元素是否被选中了,一般用在下拉列表中
EC.element_to_be_selected(element)
# 判断某个元素的选中状态是否符合预期
EC.element_selection_state_to_be(element)
# 判断某个元素的选中状态是否符合预期
EC.element_located_selection_state_to_be(locator, is_selected)
ActionChains
调用ActionsChains方法时,不会立即执行,而是将所有操作按顺序存放在一个队列中,当调用perform()方法时,队列中的事件会依次执行。
from selenium.webdriver import ActionChains

action = ActionChains(driver)  # 生成一个动作
action.添加方法1
action.添加方法2
action.perform()  # 执行
鼠标操作
from selenium.webdriver import ActionChains

ActionChains(self.driver).func1().func2().perform()  # 按顺序执行func1和func2

.reset_actions()  # 清除已存储的actions
.pause(seconds)  # 保持n秒
.click()  # 单击左键
.context_click()  # 单击右键
.double_click()  # 双击左键

.click_and_hold()  # 单击左键,不松开
.release()  # 在某个元素上松开按键

.drag_and_drop(source, target)  # 拖拽到某个元素后松开
.drag_and_drop_by_offset(source, xoffset, yoffset)  # 拖拽到某个坐标后松开

.move_to_element(to_element)  # 鼠标移到某个元素hover
.move_by_offset(xoffset, yoffset)  # 鼠标移到某个坐标hover
.move_to_element_with_offset(to_element, xoffset, yoffset)  # 鼠标移动到距某个元素一定距离的位置hover
按键操作
# Actions类中的sendKeys
from selenium.webdriver.common.keys import Keys

element = driver.find_element_by_xxx
element.click()

# 注意:执行完perform后面如果再想执行其它actions,需要重新实例化actions
actions = ActionChains(self.driver)

actions.send_keys(Keys.SPACE)
actions.send_keys_to_element(element, Keys.xxx)

actions.key_down(Keys.CONTROL).send_keys("a").key_up(Keys.CONTROL)

actions.perform()
还可以
# WebElement.sendKeys
e.send_keys(Keys.CONTROL, "a")
截图
driver.save_screenshot('xxx.png')  # 保存截图
driver.get_screenshot_as_file(file_path)  # 获取当前截图的完整路径
driver.get_screenshot_as_base64()  # 获取当前截图的base64字符串
driver.get_screenshot_as_png()  # 获取当前截图的二进制数据
异常
from selenium.common.exceptions import TimeoutException