Pytest
| 特性 | unittest | pytest |
|---|---|---|
| 类型 | Python 标准库 | 第三方库 |
| 风格 | 面向对象(基于类和方法) | 函数式,更简洁(支持类和方法) |
| 断言样式 | assertEqual()、assertTrue()等特定的断言方法 | Python 内置的 assert |
| 测试发现机制 | 支持自动发现 | 强大的自动发现 |
| 前置/后置装饰 | setUp() 和 tearDown() | 灵活的 fixture 系统 |
| 插件生态系统 | 较少的第三方插件 | 丰富的插件生态 |
| 适用场景 | 适用于熟悉 xUnit 架构的开发者 | 更高的灵活性和简洁性,适用于各种规模的项目 |
pip install pytest  # install

pytest --version   # shows where pytest was imported from
pytest --fixtures  # show available builtin function arguments
pytest -h | --help # show help on command line and config file options
Case编写规范
test_xxx.py 或 xxx_test.py
import pytest


def setup_module():
    print("模块开始执行一次")

def teardown_module():
    print("模块结束执行一次")

def setup_function():
    print("每个函数前执行一次")

def teardown_function():
    print("每个函数后执行一次")

def test_func1():
    print("func1")
    assert a == b  # 断言

def test_func2():
    print("func2")

class TestDemo:
    """
    不能写init方法
    前置方法中的 self.xxx 属性可以被其他方法或用例引用
    """

    def setup_class(self):
        self.k = "哈哈"
        print("类开始执行一次")

    def setup_method(self):
        print("每个方法前执行一次")

    # 等价于setup_method的简写
    def setup(self):
        print("每个方法前执行一次")

    # 等价于teardown_method的简写
    def teardown(self):
        print("每个方法后执行一次")

    def teardown_method(self):
        print("每个方法后执行一次")

    def teardown_class(self):
        print("类结束执行一次")

    # 注意:必须带self
    def test_method1(self):
        print(self.k)  # 调用前置方法中的属性
        print("method1")

    def test_method2(self):
        print("method2")
参数化
- 普通形式:
@pytest.mark.parametrize
不能用于前置方法的参数化,前置方法如果要参数化,可以借助 fixture 来实现
import pytest

# 数据驱动:把Case存入YAML、EXCEL等文件中读取
_list = yaml.safe_load(open(yaml_file))  # [[1,1], [1, 2], [1,3], [2,1], [2,2], [2,3]]

@pytest.mark.parametrize("a,b", _list)
"""
@pytest.mark.parametrize(
    argnames,  被参数化的变量,字符串中逗号分隔变量,也可以是列表或元组的形式
    argvalues,  与变量一一对应的一组值:[(1,2), (1,3), (1,4)],如果只有一个变量可写成:(1, 2, 3)
    ids=None,  给每组Case起别名
    indirect=False
)
"""
def test_demo(a, b):
    print(a+b)
- 笛卡尔积形式
# 参数化,笛卡尔积形式:会产生2x3=6条Case,与上面等价
"""
@pytest.mark.parametrize("a", [1,2])
@pytest.mark.parametrize("b", [1,2,3])
"""
@pytest.mark.parametrize 和 fixture 形式一起使用时也会形成笛卡尔积
Fixture
- 可同时定义多个fixture,作用于不同范围
- 多个Fixture之间可以互相调用,fixture函数的参数只能是另一个Fixture
- fixture如果写在conftest.py文件中,则可以被同级目录多个文件一起调用
@pytest.fixture(scope="function", autouse=False, params=None, ids=None, name=None)
"""
scope  作用范围
    session 或 package  多个文件共调用一次,通常把fixture写在conftest.py文件中
    module  模块级,类似于setup/teardown_module,会在第一个调用它的函数前开始执行,在模块最后再执行,每个函数都调用其实是为了得到返回值
    class  类级别,类似于setup/teardown_function + setup/teardown_class
    function  函数或者方法级(默认),类似于setup/teardown_function + setup/teardown_method
autouse
    False  默认,只会在传入函数名的case调用
    True  无需传参,自动为scope范围内的所有case调用,但不能给case返回值
params fixture参数化
ids  给每组Case起别名
name  fixture的名称,默认就是函数名
"""
def login():  # 为区别于用例,函数命名不能以test开头
    print("登入")  # yield前面的类似于setup_xx
    yield xxx  # 相当于return,在完成yield前面的操作后返回xxx
    print("登出")  # yield后面的类似于teardown_xx


# 传入fixture函数名login作为参数,可传入多个
def test_01(login):
    # 先登入,然后运行case,最后登出
    print("case_01")


# 在默认情况下,如果想让类中每一个方法都调用fixture,挨个传入login比较麻烦
# 此时则可以使用usefixtures装饰器让类中每个函数调用
# 不过这种方式与autouse=Ture一样无法给case返回值
@pytest.mark.usefixtures("login")  # 注意:login要写在引号内,可传入多个
class TestDemo:
    pass
conftest.py
一些fixture和hook配置,如果有多个conftest,就近原则,深度查找
# 解决收集Case中文乱码问题
def pytest_collection_modifyitems(items):
    for item in items:
        item.name = item.name.encode("utf-8").decode("unicode_escape")
        item._nodeid = item.nodeid.encode("utf-8").decode("unicode_escape")


# 动态生成日志文件名,即每执行一次就生成一个单独的日志文件
@pytest.fixture(scope="session", autouse=True)
def manage_logs(request):
    # 时间作为文件名就没必要加-或:等符号了
    now = time.strftime("%Y%m%d_%H%M%S")
    # 当前目录为pytest.ini文件所在的位置
    log_name = f'data/logs/{now}.log'
    request.config.pluginmanager.get_plugin("logging-plugin").set_log_path(log_name)
使用Fixture参数化
import pytest

@pytest.fixture(params=[(1,2,3), (11,22,33)])
def login(request):  # request其实是一个内置fixture
  return request.param  # 固定用法,通过request.param拿到每一组数据,

def test_01(login):
  print(login[0] + login[1] + login[2])
将Case的参数传递给fixture进行参数化
给fixture传了参数,可以不使用返回值,但fixture必须要被调用,不然就会报错:function uses no fixture 'xxx'
- 用例直接调用
- 用例调用其它fixture,其它fixture调用这个fixture
import pytest

@pytest.fixture()
def login(request):
    return request.param

_list = [(1,2,3), (11,22,33)]

# 如果要传多个参数可以使用字典的形式
_list = [
    {"username": "jojo", "password": "123456"},
    {"username": "hanmeimei", "password": "123456"},
    {"username": "lilei", "password": "123456"}
]

@pytest.mark.parametrize("login", _list, indirect=True)
"""
indirect=True时,argnames是一个fixture函数名,_list作为fixture的参数
可以传多个fixture: @pytest.mark.parametrize("getusername,getpassword", data, indirect=True)
"""
def test_01(login):
    print(login[0] + login[1] + login[2])
运行
参考文档:https://docs.pytest.org/en/7.1.x/how-to/usage.html#usage
- 文件中执行:
pytest.main()
if __name__ == '__main__':
    pytest.main(["test_xx.py::类/函数", "-参数"])
- 命令行执行
# 会收集所有符合编写规范的文件以及文件内的函数和类以及方法,然后根据参数等略过不需要执行的
pytest
"""
collected 7 items / 6 deselected / 1 selected
"""

# 只收集不执行
pytest --collect-only

# 查看执行过程,显示fixture关系
pytest --setup-show
测试范围
# 测试指定目录下所有文件
pytest testing/

# 测试指定文件
pytest test_x.py

# 测试指定方法
pytest test_x.py::方法名
# 测试指定类
pytest test_x.py::类名
# 测试指定类下的指定方法
pytest test_x.py::类名::方法名

# 模糊匹配(不区分大小写)
pytest -k "xxx"  # 测试包含xxx关键字的Case,不区分大小写
"""表达式
a
not a
a or b  如果想执行a.py和b.py要用or而不是and
a and b  如果想执行a_b.py可以用and
a and not b
"""
参数
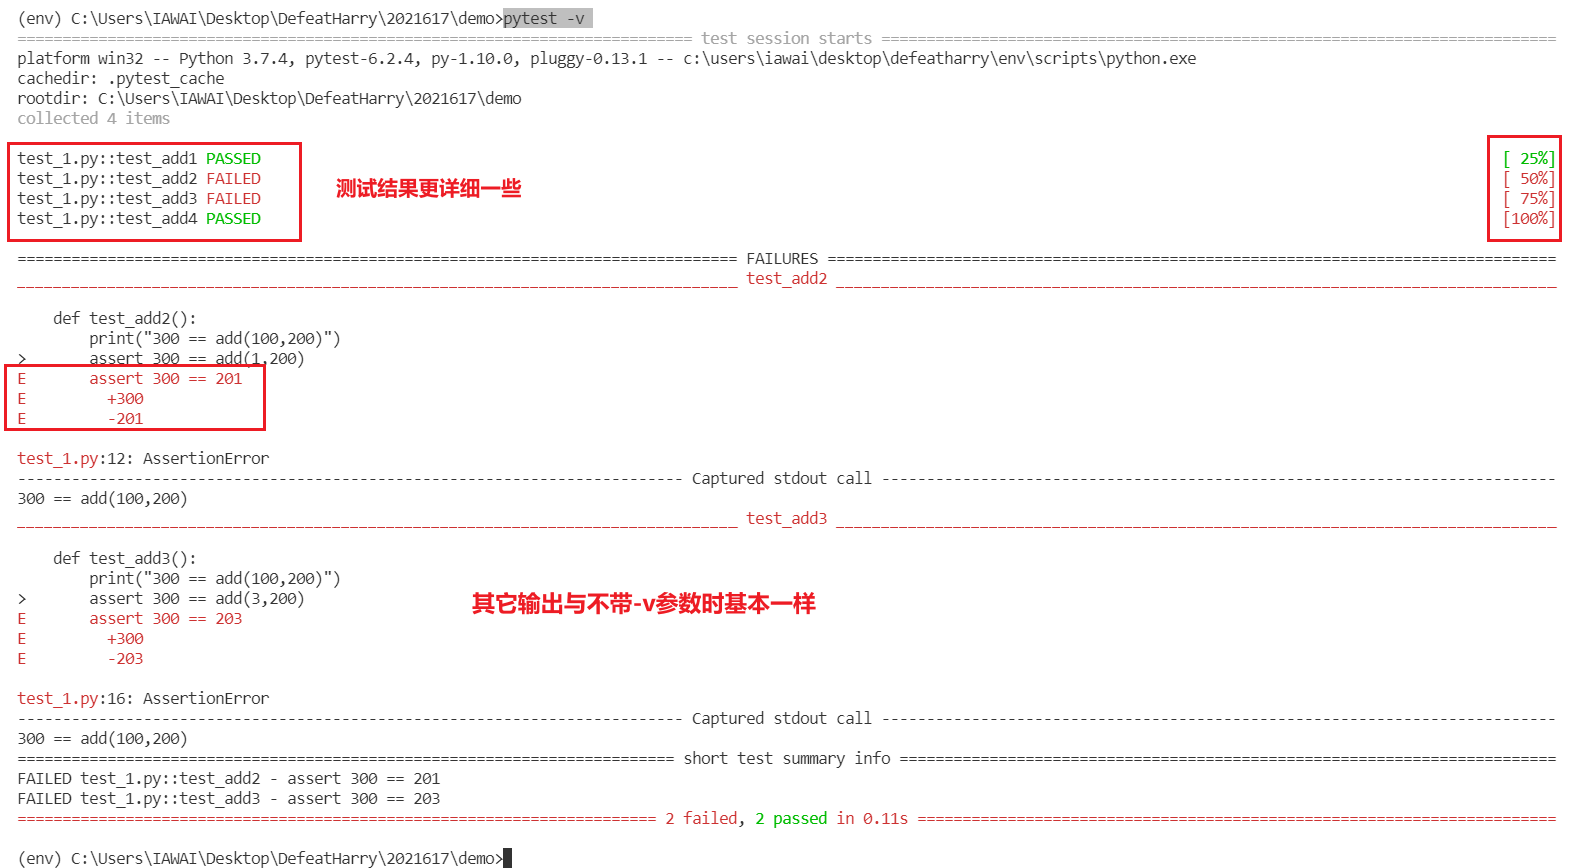
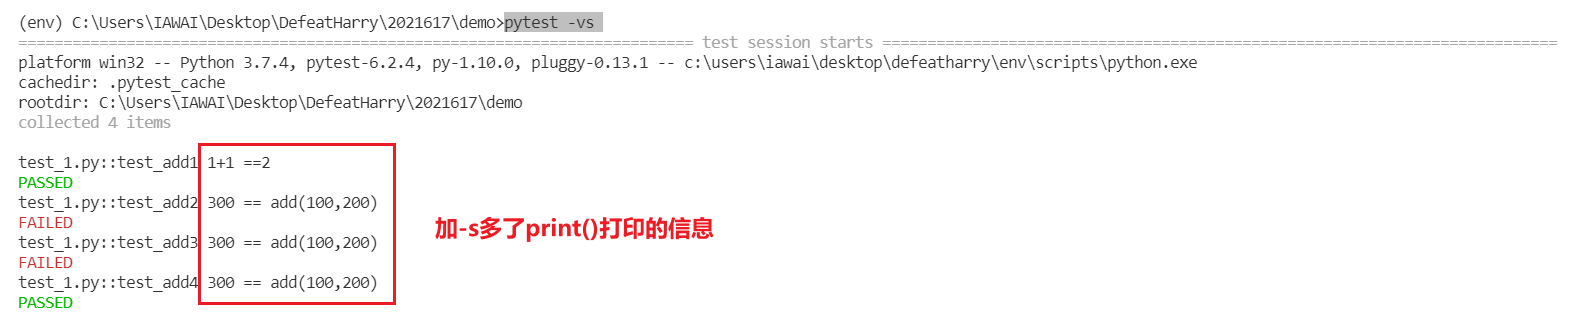
- -v, --verbose 增加详细程度
- -s, --capture=no 捕获print()信息
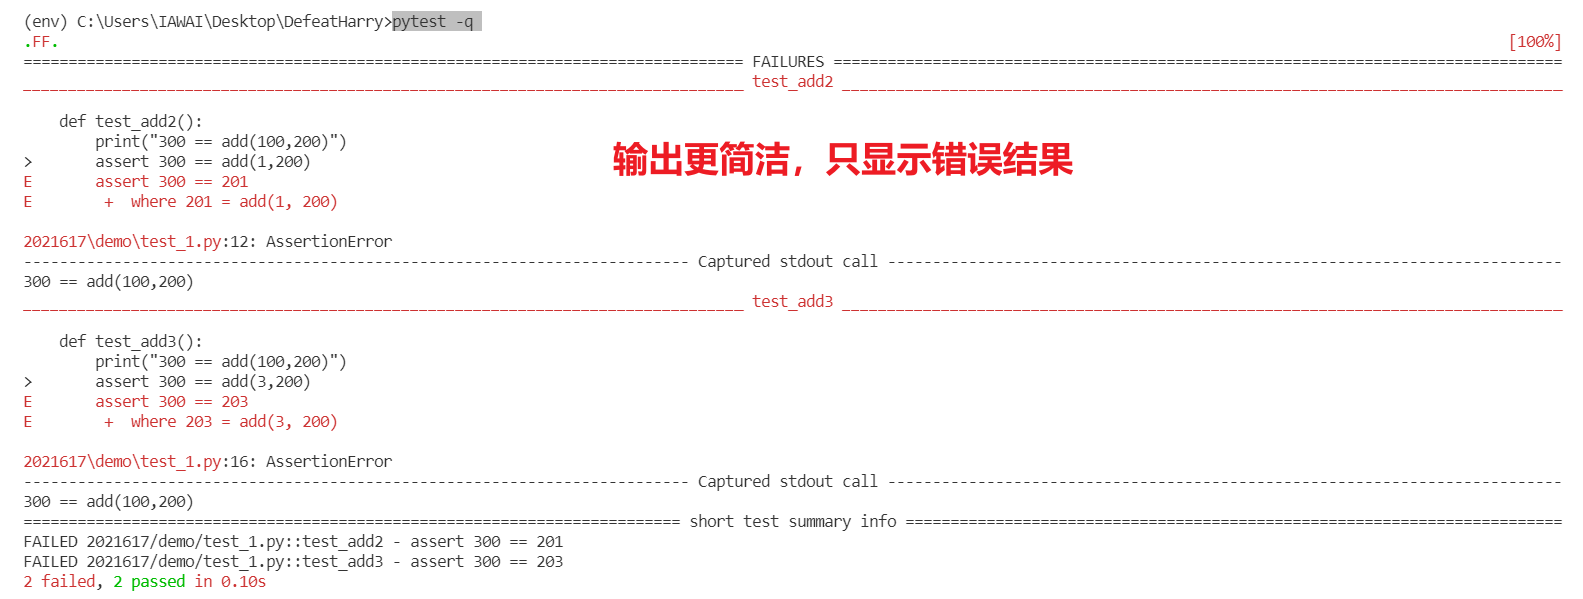
- quiet 安静
- 遇到任一条用例失败立即退出:
pytest -x - 遇到n条失败后退出:
pytest --maxfail=n - 指定标记
也可以跟-k一样加逻辑判断:pytest -m xxx
# 可加多个标记
@pytest.mark.xxx
@pytest.mark.yyy

# 内置的跳过标记
@pytest.mark.skip("原因, 可选参数")
# 满足条件则跳过
@pytest.mark.skip(a == 1, reaseon="原因")
# 满足条件跳过并标记为失败
@pytest.mark.xfail(a == 1, reaseon="原因")
[pytest]
; 注册自定义标记,skip标记不需要注册
; 如果不注册会有PytestUnknownMarkWarning的警告,但不影响运行
markers =
  default
  base
  xxx
执行顺序
Pytest默认按照收集顺序执行(即从上到下)
# 按指定顺序执行
pip install pytest-ordering
"""
@pytest.mark.run(order=n)  # n: 0、1、2、3、-3、-2、-1
未指定的用例将在这些指定了顺序的用例后按默认顺序执行
"""

# 随机执行
pip install pytest-random-order
# 失败重跑
pip install pytest-rerunfailures

# 多重断言
pip install pytest-assume

# 并发执行(多进程)
pip install pytest-xdist
"""
pytest -n auto  # 自动分配,检测系统空闲cpu数量并发执行
pytest -n 4  # 限制最多4个cpu并发执行
"""
配置文件
pytest.inipytest的配置文件,可以改变pytest的默认行为,windows下不能使用中文tox.ini与pytest.ini类似,用tox工具时候才有用setup.cfg也是ini格式文件,影响setup.py的行为
pytest.ini
[pytest]
; 参数化中的非Unicode字符串默认会进行转义,设置这个让它不转义
; 但这个方法可能会有问题,建议使用conftest.py
disable_test_id_escaping_and_forfeit_all_rights_to_community_support = True

; 指定Case路径
; 指定后就无法再指定具体文件具体方法等
testpaths = test_case

; 自定义标签加到ini中,则不会警告标签unknown
markers =
  mark1
  mark2: 可以加一些说明

; 设置运行时自带参数
addopts =
  -vs  ; 详细信息,打印print
  --setup-show  ; 显示setup和teardown
  --collect-only  ; 执行预览,并不真的运行
日志
import logging

logging.info("日志")
pytest对logging模块做了改写,需要在pytest.ini中做一些配置
[pytest]

;控制台日志开关 true false
log_cli = true
;日志级别
log_cli_level = info
;日志格式: 时间 级别 信息 文件名及行号
log_cli_format = %(asctime)s [%(levelname)s] %(message)s (%(filename)s:%(lineno)s)
;日志日期格式
log_cli_date_format = %Y-%m-%d_%H:%M:%S

;日志保存到文件的位置,当前目录为调用pytest.ini的文件所在的位置
log_file = ./data/logs/test.log
;日志级别
log_file_level = info
;日志格式: 时间 级别 信息 文件名及行号
log_file_format = %(asctime)s [%(levelname)s] %(message)s (%(filename)s:%(lineno)s)
;日志日期格式
log_file_date_format = %Y-%m-%d_%H:%M:%S
常用断言
assert xx  # 判断xx为真
assert not xx  # 判断xx不为真
assert a in b  # 判断b包含a
assert a == b  # 判断a等于b
assert a != b  # 判断a不等于b

pytest.raise()
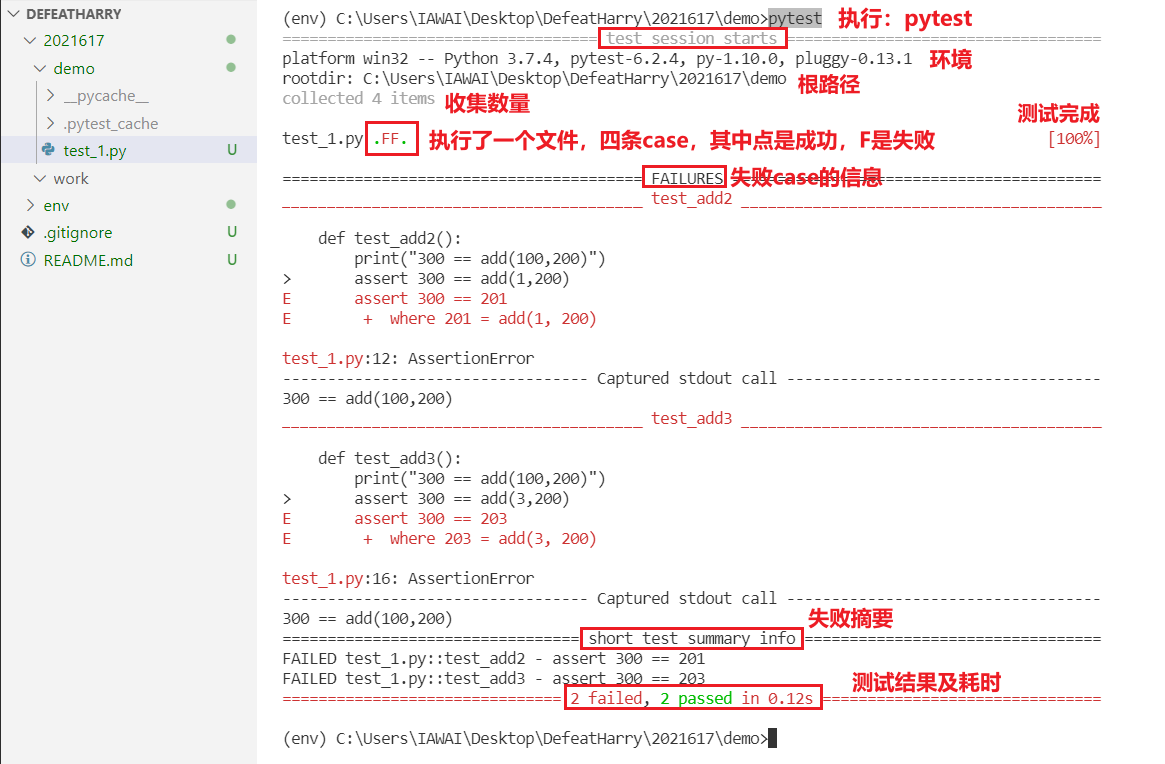
测试报告
如果加了pytest-html或Allure等报告参数,貌似-s参数就会失效
.F.F..中的.代表测试通过,F(Fail)代表测试失败
fixture中的断言如果失败,结果会显示error,case中的断言如果失败,结果会显示failed
- 生成xml文件
pytest junitxml=./result.xml
pytest-html
pip install pytest-html

# --self-contained-html css样式混在html中,不加则独立
pytest --html=report.html --self-contained-html
可通过conftest.py文件修改一些内容
修改与汉化:https://www.cnblogs.com/linuxchao/p/linuxchao-pytest-html.html
import pytest
from py._xmlgen import html


# 测试报告标题
def pytest_html_report_title(report):
    report.title = "接口自动化测试报告"

# 修改Environment
def pytest_configure(config):
    config._metadata.pop("Plugins")  # 删除
    config._metadata["Data Path"] = "data/"  # 添加

# 修改Summary
@pytest.mark.optionalhook
def pytest_html_results_summary(prefix):
    prefix.extend([html.p("测试项目: EE")])

# 删除header
@pytest.mark.optionalhook
def pytest_html_results_table_header(cells):
    cells.pop(-1)  # link列

# 删除row
@pytest.mark.optionalhook
def pytest_html_results_table_row(report, cells):
    cells.pop(-1)  # link row

# 解决中文乱码
# @pytest.mark.hookwrapper
# def pytest_runtest_makereport(item):
#     outcome = yield
#     report = outcome.get_result()
#     getattr(report, 'extra', [])
#     report.nodeid = report.nodeid.encode("utf-8").decode("unicode_escape")
allure
pip install allure-pytest

# 指定报告相关文件存储路径
pytest --alluredir=./result/

# 直接运行生成的json报告文件
allure serve ./result/

# 转换成html格式,--clean覆盖
allure generate ./result/ -o ./report/ --clean
# 指定IP运行
allure open -h 127.0.0.1 -p 7788 ./report/