OpenPyXL
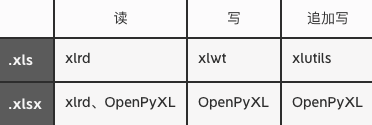
操作Excel2007文件时(.xls),不同操作需要使用不同的库
操作Excel2010文件时(.xlsx/xlsm/xltx/xltm),OpenPyXL库可以同时满足常见的读写等操作
安装:pip install openpyxl
工作簿 WorkBook
import openpyxl

wb = openpyxl.load_workbook(filename=file_path)  # 读取
wb_new = openpyxl.Workbook()  # 新建工作簿,默认同时会创建一张名为Sheet的表
# <openpyxl.workbook.workbook.Workbook object at 0x101d48e50>
wb_new.save(filename=file_path)  # 保存
工作表 WorkSheet
# 新建Sheet,默认插在末尾
# 不指定表名时系统会自动命名,依次为:Sheet, Sheet1, Sheet2
wb.create_sheet(title=None, index=None)

# 获取所有Sheet
ws_list = wb.sheetnames  # ['Sheet1','Sheet2']
ws_list = get_sheet_names()  # 同上

sh_title = ws_list[index]  # 获取表名

# 根据表名(大小写敏感)获取任意一张表
sh = wb[sh_title]

# 获取当前活动的表,默认为第一张表
sh = wb.active  # <Worksheet "Sheet1">

sh.title = "xxx"  # 设置表名
sh.sheet_properties.tabColor = "4b5cc4"  # 设置标签底色
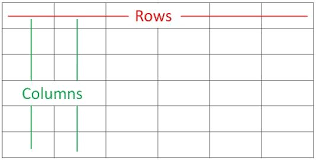
- 获取行/列生成器
注意:行和列的索引都是从1开始的,而不是0
# 获取所有行/列,返回generator
rows = sh.rows
cols = sh.columns

# 指定范围,返回generator
rows = sh.iter_rows(min_row=1, max_row=3, min_col=1, max_col=3)
cols = sh.iter_cols(min_row=1, max_row=3, min_col=1, max_col=3)

# 遍历每一行/列
for row in rows:
    print(row)
    """
    (<Cell 'Sheet1'.A1>, <Cell 'Sheet1'.B1>, <Cell 'Sheet1'.C1>)  # row1
    (<Cell 'Sheet1'.A2>, <Cell 'Sheet1'.B2>, <Cell 'Sheet1'.C2>)  # row2
    (<Cell 'Sheet1'.A3>, <Cell 'Sheet1'.B3>, <Cell 'Sheet1'.C3>)  # row3
    """
- 获取行/列数
使用内置属性获取的结果,会包含被清空但实际显示为空的行/列/单元格
sh.dimensions  # 获取有数据(包含被清空的)的单元格范围,A1:L6
sh.max_row  # 行数
sh.max_column  # 列数
使用自定义方法获取真实行/列数
# 真实行数
def real_rows_amount(self):
    for i in sh_new["A"]:
        if i.value:
            amount = i.row
    return amount

# 真实列数
def real_cols_amount():
    for i in sh[1]:
        if i.value:
            amount = i.column
    return amount
单元格 Cell
- 获取单元格
# 获取指定的一行
cells = sh[3]
"""
(
  <Cell 'Sheet1'.A3>, <Cell 'Sheet1'.B3>, ...  # row3
)
"""

# 获取指定的一列
cells = sh["C"]
"""
(
  <Cell 'Sheet1'.A1>, <Cell 'Sheet1'.A2>, ...  # columnC
)
"""

# 获取多行
cells = sh[1:2]
"""
(
  (<Cell 'Sheet1'.A1>, <Cell 'Sheet1'.B1>, <Cell 'Sheet1'.C1>, ...),  # row1
  (<Cell 'Sheet1'.A2>, <Cell 'Sheet1'.B2>, <Cell 'Sheet1'.C2>, ...)   # row2
)
"""

# 获取多列
cells = sh["A:B"]
"""
(
  (<Cell 'Sheet1'.A1>, <Cell 'Sheet1'.A2>, <Cell 'Sheet1'.A3>, ...),  # columnA
  (<Cell 'Sheet1'.B1>, <Cell 'Sheet1'.B2>, <Cell 'Sheet1'.B3>, ...)   # columnB
)
"""

# 获取多行多列
cells = sh["A1:C2"]
"""
(
  (<Cell 'Sheet1'.A1>, <Cell 'Sheet1'.B1>, <Cell 'Sheet1'.C1>),  # row1
  (<Cell 'Sheet1'.A2>, <Cell 'Sheet1'.B2>, <Cell 'Sheet1'.C2>)   # row2
)
"""

# 获取一个单元格  <Cell 'Sheet1'.A1>
cell = sh.cell(row=2, column=3)  # 根据行号和列号获取
cell = sh["A1"]  # 根据坐标获取

# 创建100个单元格
for i in range(1,101):
    for j in range(1,101):
        sh.cell(row=i, column=j)
单元格属性
cell.row  # 行号,2
cell.column  # 列号,3
cell.coordinate  # 坐标,C2
cell.value = "xxx"  # 单元格内容,空则返回None
sh['K11'] = '=AVERAGE(K1:K10)'  # 写入公式
- 获取任意行或列的单元格内容
def cells_any_line(row_or_col):
    _list = []
    cells = sh[row_or_col]
    for cell in cells:
        _list.append(cell.value)
    return _list

row1 = cells_any_line(1)
col1 = cells_any_line("A")
- 根据列号和单元格内容获取行号
def get_row(col_index, cell_value):
    row = None
    for cell in sh[col_index]:
        if cell.value == cell_value:
            row = cell.row
    return row

c = row_index("A", "infoq_003")
print(c)
- 根据行号和单元格内容获取列号
def get_col(row_index, cell_value):
    col = None
    for cell in sh[row_index]:
        if cell.value == cell_value:
            col = cell.column
    return col

r = col_index(1, "host")
print(r)
- 根据行号和表头字段获取单元格内容
def get_field(self, row, field_name):
    col = get_col(field_name)
    cell_value = sh_new.cell(row, col).value
    return cell_value
复制Sheet
并没有一个内置方法可以直接复制Sheet,需要遍历所有单元格内容,写入新创建的一张表
def copy_sheet(self, ws_old):
    ws_list = self.wb_copy.sheetnames
    ws = self.wb_copy[ws_list[0]]

    # 把wb中的sheet复制到wb_copy中
    for m in range(1, ws_old.max_row+1):
        for n in range(97, 97 + ws_old.max_column):  # ord("a")==97
            coordinate = f'{chr(n)}{m}'  # 坐标,chr(97)=='a'
            # 旧cell的值赋值给新cell
            ws[coordinate] = ws_old[coordinate].value
    # 保存修改
    self.wb_copy.save(self.result_path)
    self.wb_copy.close()

    return ws
单元格方法
- 行操作
sh.append(_list)  # 增加一行

sh.insert_rows(idx=2, amount=3)  # 在第2行上方插入3行,省略amount则默认插入一行
sh.insert_cols(idx=2, amount=3)  # 在第2列左侧插入3列,省略amount则默认插入一列

sh.delete_rows(idx=2, amount=3)  # 删除行
sh.delete_cols(idx=2, amount=3)  # 删除列

sh.move_range("C1:D2", rows=3, cols=-2)  # 移动行,数字为移动的步长,正数为向下/向右移动,负数为向上/向左移动
- 合并单元格
# 合并
sh.merge_cells('A1:B2')
# 或
sh.merge_cells(start_row=1, start_column=3, end_row=2, end_column=4)

# 取消合并
sh.unmerge_cells('A1:B2')
# 或
sh.unmerge_cells(start_row=1, start_column=3, end_row=2, end_column=4)

wb.save(filename)  # 最后一定要记得保存
单元格样式
- 行高、列宽
sh.row_dimensions[1].height = 50
sh.column_dimensions['C'].width = 20
- 字体
from openpyxl.styles import Font

font = Font(name="微软雅黑", size=12, bold=True, italic=True, color="FF0000")
"""
:name 字体名称
:size 大小
:bold 粗体
:italic 斜体
:color 颜色
"""
cell.font = font
- 对齐
from openpyxl.styles import Alignment

alignment = Alignment(horizontal="center", vertical="center", text_rotation="45", wrap_text=True)
"""
:horizontal 水平对齐:distributed, justify, center, left, fill, centerContinuous, right, general
:vertical 垂直对齐:bottom, distributed, justify, center, top
:text_rotation 字体倾斜度
:wrap_text 自动换行
"""
cell.alignment = alignment
- 边框
from openpyxl.styles import Side, Border

side = Side(style="thin", color="FF0000")
"""
:style 边线样式 double, mediumDashDotDot, slantDashDot, dashDotDot, dotted, hair, mediumDashed, dashed, dashDot, thin, mediumDashDot, medium, thick
:color 边线颜色
"""
border = Border(left=side, right=side, top=side, bottom=side)  # 边线
cell.border = border
- 填充样式
from openpyxl.styles import PatternFill, GradientFill

# 单色填充
patter_fill = PatternFill(fill_type="solid", fgColor="99ccff")
cell.fill = patter_fill

# 渐变填充
gradient_fill = GradientFill(stop=("FFFFFFF", "99ccff", "000000"))
cell.fill = gradient_fill
from openpyxl.styles import PatternFill

# 向单元格写入内容,并着色
def write_cell_value(self, row, column, value, color=None):
    cell = self.sh_new.cell(row=row, column=column)
    cell.value = value
    if color:
        cell.fill = PatternFill(fill_type="solid", fgColor=color)

    self.wb_copy.save(self.result_path)
    self.wb_copy.close()